Build Your Own NAS: The Ultimate Guide to DIY Storage Solutions in 2025
In today’s digital age, the need for reliable and expandable home data storage solutions is more critical than ever. Whether you’re looking to store your family photos, back up important documents, or host a personal media server, building your Network Attached Storage (NAS) can provide a customized and cost-effective solution. This article will guide you through the process of creating a DIY NAS that meets your specific storage needs and unlocks the full potential of home media server capabilities.
With over a decade of experience in the DIY NAS space, we’ll share our insights on the key criteria for a successful home storage project. This includes selecting the right hardware components, such as a small form factor motherboard with ample SATA ports, a power-efficient CPU, and a case that can accommodate multiple hard drives. By understanding your storage needs and choosing the appropriate RAID configuration, you’ll be able to create a flexible, secure, and energy-efficient NAS that meets your specific requirements.
Introduction to DIY NAS
Building your own DIY NAS (Network Attached Storage) can be a rewarding and cost-effective solution for your home network storage needs. By constructing a custom NAS server, you can unlock a world of flexibility, control, and personalization that often exceeds the capabilities of pre-built network-attached storage devices.
Why Build a DIY NAS?
The primary appeal of creating a home network storage solution lies in the ability to tailor the hardware and software components to your specific requirements. This level of customization allows you to optimize the DIY NAS for your personal storage needs, whether it’s for home media server capabilities, personal cloud storage, or a robust data backup solution.
Benefits of a DIY NAS
By building your own NAS server, you can enjoy several key benefits, such as cost savings, increased control over your data, and the opportunity to learn and expand your technical skills. The flexibility to choose the right hardware, storage capacity, and software features ensures that your DIY NAS is tailored to your specific needs, providing a more efficient and personalized storage solution compared to off-the-shelf options.
Planning Your DIY NAS
Before embarking on your DIY NAS project, it’s crucial to carefully plan and consider your storage needs. Estimating your home network storage and media storage requirements will help you determine the appropriate size and number of hard drives to include in your custom-built NAS server. By accounting for your current and future data backup solution needs, you can ensure your home media server and network attached storage solution is optimized for your specific use case.
Estimating Storage Capacity Needs
When planning your DIY NAS, take the time to assess your existing and anticipated personal cloud storage requirements. Consider the size of your digital media collection, personal files, and any additional backup data you need to accommodate. Leave room for future growth by overestimating your storage needs, as it’s easier to start with larger drives than to expand later on.
Choosing Between Large or Small Drives
One key decision in your DIY NAS build is whether to use a smaller number of high-capacity drives or a larger number of smaller drives. Larger drives offer more storage per drive, but they can be more expensive. Smaller drives may be more cost-effective per terabyte, but they may require more drive bays. Weigh factors like your budget, physical space constraints, and the impact on redundancy and performance when selecting the appropriate drive size for your home network storage needs.
Selecting the Appropriate RAID Level
Another crucial aspect of planning your DIY NAS is choosing the right RAID (Redundant Array of Independent Disks) configuration. RAID levels offer varying degrees of data redundancy, storage capacity, and performance. Common RAID options for a home media server include RAID 1 (mirroring), RAID 5 (striping with parity), or RAID 6 (striping with dual parity). Carefully consider your priorities, such as data protection, usable storage space, and read/write performance, when selecting the optimal RAID level for your network-attached storage setup.
Choosing the Right Components
When building your own DIY NAS (network-attached storage) system, selecting the right components is crucial. From the motherboard and CPU to the case and storage drives, each choice can impact the overall performance, power efficiency, and cost-effectiveness of your custom NAS server.
Motherboard and CPU Considerations
Look for a motherboard and CPU that strike a balance between processing power and energy efficiency. A low-power processor, such as an Intel Celeron or AMD Ryzen chip, can provide ample performance for common NAS tasks while minimizing power consumption. The motherboard should offer features like multiple SATA ports, support for the chosen CPU, and compatibility with your preferred NAS operating system, such as TrueNAS or FreeNAS.
Selecting a Suitable Case
The case you choose for your DIY NAS should be designed specifically for network-attached storage applications. Look for cases that offer features like space for multiple hard drives, efficient cable management solutions, and a compact form factor. The JONSBO N1, for example, can accommodate up to five 3.5″ HDDs and one 2.5″ drive, all while maintaining a small footprint.
RAM and Boot Drive Options
When it comes to RAM, aim for a minimum of 8GB, with the option to upgrade to 16GB or more if your budget allows. This will provide ample memory for the NAS operating system and any additional services or applications you plan to run. For the boot drive, a small SSD or high-capacity NVMe drive can serve as a fast and reliable operating system storage solution, freeing up the larger hard drives for data storage.
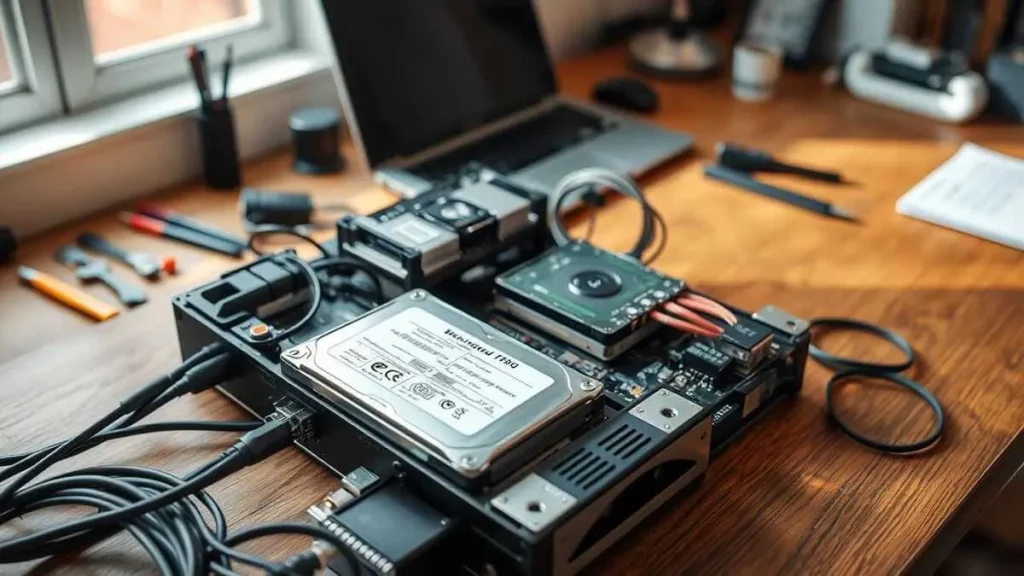
DIY NAS Build Process
Building your network-attached storage (NAS) device can be a rewarding and cost-effective project. The DIY NAS build process involves carefully assembling the hardware components, installing the NAS operating system, and configuring the storage. This hands-on approach allows you to customize your NAS server to meet your specific needs and budget.
The first step is to carefully mount the motherboard and install the CPU and RAM. Attention should be paid to the layout and airflow within the network-attached storage case, ensuring efficient cooling and long-term reliability. Once the core components are in place, the hard drives can be connected, and proper cable management should be ensured for a clean and organized interior.
For the NAS operating system, many users opt for the popular TrueNAS SCALE, an open-source platform based on Debian Linux. This versatile software offers features like virtual machine support and container integration, making it a compelling choice for advanced users. The installation process involves creating storage pools and configuring volumes to suit your data storage needs.
By taking the time to meticulously plan and build your diy nas, you can create a powerful and reliable storage solution tailored to your specific requirements. The satisfaction of crafting a custom NAS system can be highly rewarding, and the resulting device can serve as the backbone of your home or small office network for years to come.
Storage Configuration
When building your DIY NAS, it’s crucial to have a robust and reliable storage configuration. This guide recommends utilizing the powerful ZFS file system and the user-friendly TrueNAS operating system to manage your storage needs.
Understanding ZFS and TrueNAS
ZFS is an enterprise-grade file system that offers advanced features like data redundancy, snapshots, and compression. TrueNAS is a free and open-source NAS software that is well-suited for DIY home network storage projects, providing a comprehensive storage management interface.
Setting Up Storage Pools and Volumes
After installing TrueNAS, you’ll need to configure the storage pools and volumes. This involves creating a ZFS storage pool using the available hard drives, and then setting up individual volumes within the pool to organize and manage your cloud storage. The process includes selecting the appropriate RAID level, configuring data redundancy, and allocating storage capacity based on your needs and preferences.
By leveraging the power of ZFS and the convenience of TrueNAS, you can create a robust and reliable DIY NAS server that serves as a central data backup solution for your home or small office network.
Software Setup and Configuration
With the hardware components of your DIY *nas server* assembled, it’s time to install the NAS operating system that will power your homemade *network-attached storage*. A popular and recommended choice is *TrueNAS*, thanks to its robust features, user-friendly interface, and seamless integration with the ZFS file system. However, if you have specific requirements or preferences, other open-source NAS solutions like *UnRAID* or *OpenMediaVault* are also viable alternatives for your *diy nas* project.
Installing TrueNAS or Other NAS Operating Systems
The installation process for your NAS operating system will vary depending on your chosen platform. *TrueNAS*, for example, provides comprehensive documentation and step-by-step guides to walk you through the setup process. This includes configuring storage pools, creating file systems, and integrating various services and applications to suit your needs. Similarly, *UnRAID* and *OpenMediaVault* offer their own user-friendly installation and configuration tools to get your *nas server* up and running.
Regardless of the NAS operating system you select, the key is to familiarize yourself with the platform’s features and capabilities, ensuring that it aligns with your *diy nas* requirements. Take the time to explore the available options, read reviews, and choose the solution that best fits your personal preferences and the needs of your home or small office network.
Expanding and Maintaining Your DIY NAS
One of the advantages of building a DIY NAS is the ability to easily expand your storage capacity as your needs grow. Depending on the NAS operating system and the RAID configuration you choose, you may be able to add additional hard drives to the storage pool, increasing the total available data backup solution. Additionally, you can replace existing drives with larger-capacity models to expand your cloud storage without having to rebuild the entire system.
Adding More Storage in the Future
As your home media server requirements evolve, you can seamlessly integrate more storage into your DIY NAS. This allows you to keep up with the ever-increasing demand for data backup solutions and ensures your centralized storage solution can accommodate your growing needs.
Backup Strategies for Your DIY NAS
While a DIY NAS provides a convenient and reliable storage solution, it’s essential to implement a robust backup strategy to protect your valuable data. This may include regularly backing up your NAS to an external hard drive, a cloud storage service, or a secondary DIY NAS. Additionally, you can leverage the snapshot and replication features of file systems like ZFS to create point-in-time backups of your data, ensuring you can recover from accidental deletions or data corruption.
By being proactive in expanding and maintaining your DIY NAS, you can ensure that your personal data backup solution continues to meet your evolving storage requirements and provides a secure and reliable home media server for years to come.
To Conclude This DIY Storage Solutions
Building your DIY NAS is a rewarding and cost-effective way to create a customized home network storage solution. By carefully planning your storage needs, selecting the right hardware components, and configuring the storage and software, you can create a powerful and flexible NAS that meets your specific requirements. Whether you’re a data hoarder, a media enthusiast, or simply looking for a reliable way to centralize and protect your important files, a DIY NAS can be the perfect solution.
The DIY NAS blogs series has proven to be the most popular among readers, with FreeNAS being the preferred choice for building a NAS, according to the author. The upcoming EconoNAS build will be used to test and evaluate various NAS software packages, including NAS4Free and OpenMediaVault, both of which offer compelling features and performance characteristics.
As you embark on your DIY NAS journey, remember to consider factors such as redundancy, appliance-like management, remote management capability, active maintenance, cost-effectiveness, and the ability to run on older or cheaper hardware. With the right components, including powerful CPUs, ample RAM, and high-endurance storage drives like the SanDisk Ultra 3D SSDs, you can create a NAS that delivers exceptional performance and reliability. Whether you choose to build your NAS from scratch or leverage a compact solution like the Raspberry Pi, the satisfaction of creating your custom home network storage system is well worth the effort.